Our DIY Cake Smash!
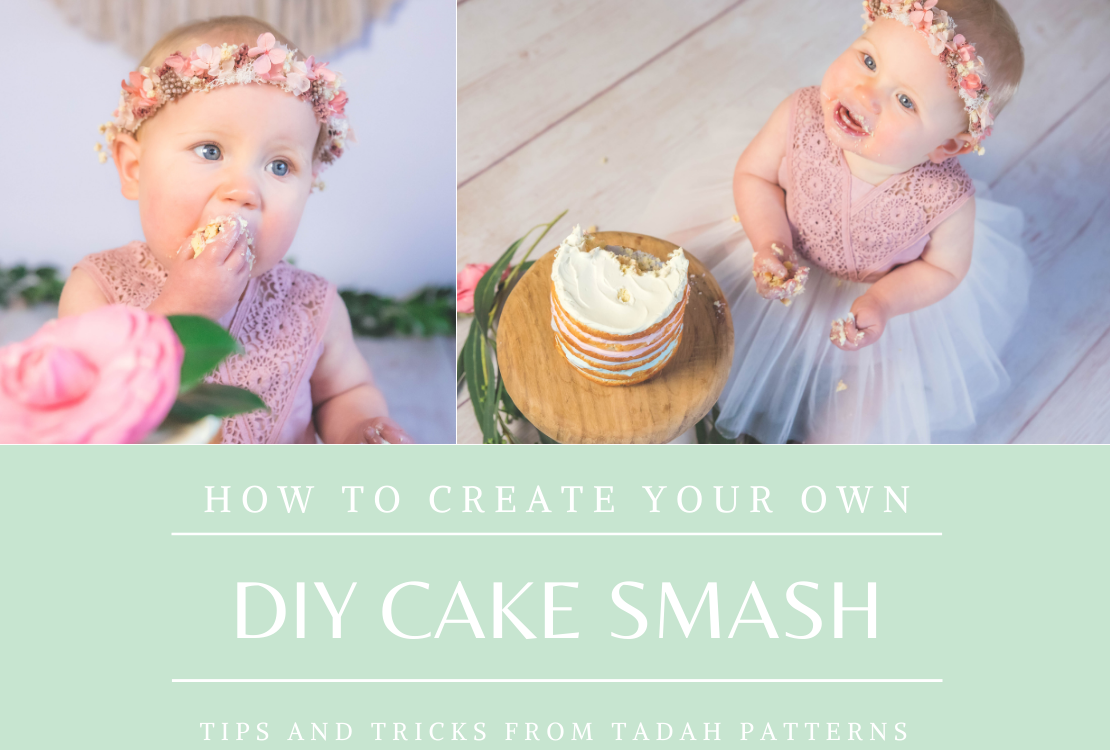
Given that many of us find ourselves in and out of lockdown these days, I thought it might be of interest to some of you to know how we created a DIY Cake Smash for Sia's first birthday celebration!
Here is a little peak at what we created. I say 'we' because this was a team effort from the Tadah family. My older girls were very heavily involved in the planning, set up and execution. Choosing to DIY her cake smash rather than paying a photographer was not so much a financial decision but more of a creative one. We thoroughly enjoyed dreaming up ideas and working on this together.

Lets's start at the start..
1. The Set Up
Whenever you are planning photos the most important thing to consider is LIGHTING. Have a look around your house/yard/local area to find a spot that has a lot of natural light but is not hit with direct harsh sunlight (this will give you heavy shadows). We decided on a wall in our living room that is close to some big glass windows/doors.
The next thing to consider is your BACKDROP. If you have a nice white/bright wall that would be perfect! Unfortunately we don't, so I have used a photography backdrop here. A freshly ironed white sheet or large piece of vinyl would also work well. Check out this fabulous blog post for some DIY backdrop ideas.

Also consider your FLOORING. If you have some nice tiles or floorboards in your photo space this would be perfect. It may seem obvious but DO NOT do your cake smash on carpet - that is just asking for a cleaning headache! If you do not have appropriate flooring you can extend your sheet/vinyl to cover the floor also, or use an offcut of cheap lino from your local hardware/flooring shop.
And finally - Make sure you reduce all clutter in your photo space - you want your child and the cake to be the centre of attention!
We did a few practice photos in the days leading up to the cake smash just to make sure we were happy with the set up.

2. The Cake
You will want to choose/plan your cake early on as this will set the theme or style for your photos. Of course you can make the cake yourself, however I am a terrible baker so I chose to splash out on the cake and ordered from a lovely lady named Marina from Nutjob Bakery. If you are in Sydney I HIGHLY recommend her cakes. Not only are they beautiful, they are also made using minimal sugar (just a little maple syrup) and all whole food ingredients, so you can feel good about your littlie stuffing their face with these delicious cakes!

If you do choose to make your own cake here are a few things to consider:
- Height always looks good - think about stacking many thin layers rather than having one big thick one
- Texture - The cake needs to be soft enough for the baby to grab it but not so crumbly that it falls apart before they can get it in their mouth
- The icing - Buttercream is perfect for messy fun. Add some colour if it fits your theme.
- Decorate the cake - Think about what suits the theme of your shoot. We went with floral and greenery but you could use a cake topper, sprinkles or other cake decorations that fit with the style you are going for.
3. The Props & Decor
Here is where the real fun starts! Setting the scene and creating a theme 😍
We chose a boho/botanical theme for Sia's photos. Using a macrame banner that we had at home, I pushed the macrame 'flags' together and tied them to a big stick that we found in our yard to create this little hanging decor. My girls collected some greenery from the garden to decorate.

Some other ideas that looks fabulous are bunting, paper tassels, balloons and floral wreaths. All of these can be created at home using cheap supplies!
DON'T FORGET you will need something cute to put your cake on! This could be a nice little plate or a cake stand. I happened to be walking past our local florist and spotted this adorable little stool 😍 The rustic feel of it and the cute little size was perfect for the style we had planned!
4. The Outfit
With your cake, decor and theme in mind you will need to plan an outfit.
As you may have guessed, this was my favourite part!
I knew I wanted something soft and sweet for this outfit. It had to have 'WOW' factor but not overpower the shot. I wanted Sia's little face and the cake to be the main focus. So I decided a solid colour with tulle would be perfect. After staring at my stash for what felt like HOURS, I just kept coming back to this beautiful blush pink linen from Top Knot Doll Linen Co. I had this lovely soft beige bridal tulle from GJ's Discount Fabrics that looked great with the pink.. but something was missing. It didn't have that 'WOW' yet. So I went searching for trims and tucked away in my basket of lace I found a little cut of this incredible hand dyed pink lace from Pitt Trading which matched PERFECTLY!
I toyed with the idea of just laying a small piece of lace down the front of the Baby Tea Party bodice, but I didn't think that would be enough so I decided to create a mash between the Amor Dress and the Baby Tea Party.
I used the bodice of the Amor dress however since the bodice is a bit longer than the Baby Tea Party bodice I took 1" off the height of the bodice. That is the only adjustment I needed to make so this was a super simple mash!

The bodice (Amor) and playsuit (Baby Tea Party) were cut from the pink linen, then I cut the skirt (Baby Tea Party) from 6 layers of tulle. I'm a little too impatient to gather each layer separately so I did it in two lots - I lined up 3 layers of the tulle together and ran gathering stitch across the top, then gathered those 3 layers all at once and attached to the bodice. I then repeated this with the other 3 layers of tulle. It worked perfectly and had the perfect amount of volume!
With the lace straps, I actually attached these AFTER closing and finishing the bodice. I placed the lace in a 'V' on the front of the bodice and then stuck it down with Lite Steam-A-Seam to keep it in place while sewing. To get the strap length *just* right for my petite little miss I actually tried it on her before determining the length, then the straps were hand sewn on the inside of the back bodice.

Of course everyone knows that you have to ACCESSORISE! So we went on a hunt for the perfect floral crown. It had match the colours in the outfit, suit our theme and be petite enough not engulf her whole head and detract from her face and the cake. We found absolute perfection from Flora Blooms Design on Etsy. Norrie was incredibly helpful, posted very quickly and packaged it so carefully that it arrived looking incredible.

5. The Timing
We all know with babies that timing is CRUCIAL! It is the difference between a beaming smile and I complete melt down. The beauty of doing your own cake smash shoot is that you can be flexible and plan your shoot around naps so that you have the best chance of a happy baby. Ideally, you would also like your littlie to be hungry (so they want to eat the cake!) but not so hungry that they're cranky. It's a fine line, but as their parent you're the best person to judge when would be the best timing.

7. And finally... The PHOTOS!!
As an amateur photographer I can often get overwhelmed and a little frazzled going in to a shoot, particularly one like this where you only really get one go at it. Once that cake has been eaten, there's no going back!

I found the best way to approach it was to have HELPERS and to have a PLAN.
Helpers (Hubby and my older girls) meant that there were many hands to position Sia if she tried to crawl away and to get her attention and make her smile. This left me free to snap away without interruption.

And a plan for what photos we wanted to get was HUGE. We watched a few cake smash YouTube videos to get ideas. By far the most helpful was this video by Fenna and Photography on her Top 10 MUST-HAVE photos to take during a Cake Smash. We wrote these all down and made sure we got (or at least attempted) all of the ones on the list.

PRO TIP: Make sure you get your camera settings just right BEFORE bringing the baby in to the mix. I took some photos of the cake first to make sure I was happy with everything before Sia came in.

If your bub is a little timid like Sia you may need to get them started and show them that it's ok to eat this huge cake in front of them. We pulled off a bit from the back of then cake and handed it to Sia to get her started. Once she had a taste there was no stopping her! Which reminds me, don't forget to get a photo of the aftermath 🎂

I hope this gives you a little inspo for creating your own DIY Cake Smash! We honestly had SUCH a fun time doing this together as a family. Sia had the BEST time shovelling fists full of cake in to her mouth and we all had just as much fun watching (and laughing at) her ❤️
If you do choose a DIY Cake Smash please tag us in your photos - we would love to see them and share in the joyous celebration!
Lauren x
P.S. Wow! It has been a while between blog posts 😅 But we're back! And vowing to give this neglected blog A LOT more lovin' moving forward. If you have any ideas for what you would like to see on the blog (or if you would like to contribute) pop us an email here 🤩


Leave a comment
Comments will be approved before showing up.
© 2024 Tadah Patterns + Sewing.
Lauren Harris
Author